How to Create an Email Campaign using the NEW Email Builder
How to Create and Manage Email Campaigns in TIEIT
Email Campaigns in TIEIT help you send targeted emails to your contacts, track engagement, and understand how your audience responds. The Campaigns module is designed to give you clear visibility into performance while keeping campaign creation simple and structured.
This guide walks you through creating, sending, and managing Email Campaigns using the new Campaigns interface.
What’s in This Article
Overview of Email Campaigns in TIEIT
Email Campaigns in TIEIT help you design, send, and track targeted emails to your contacts with full control over content, audience, and timing.
The module is built to support both quick sends and carefully planned campaigns. You can create professional emails using the visual builder, choose exactly who should receive them using lists and segments, and schedule delivery at the right time.
Each campaign gives you clear visibility into performance metrics such as:
- Opens
- Clicks
- Unsubscribes
- Delivery status
This allows you to measure engagement and refine future campaigns based on real results.
Email Campaigns in TIEIT follow a structured flow:
Setup → Build → Audience → Review & Schedule
This ensures nothing is missed — from subject line and sender identity, to design, recipient selection, and final review before sending.
Whether you’re sending announcements, newsletters, event invites, or promotional emails, the Email Campaign module provides a reliable How to Create a New Email Campaign
Email Campaigns in TIEIT follow a clear 4-step flow:
Setup → Build → Audience → Review & Schedule
You start by naming the campaign and defining sender details, design the email in the visual builder, choose who should receive it, and finally review and schedule the send. organized way to communicate with your contacts at scale.
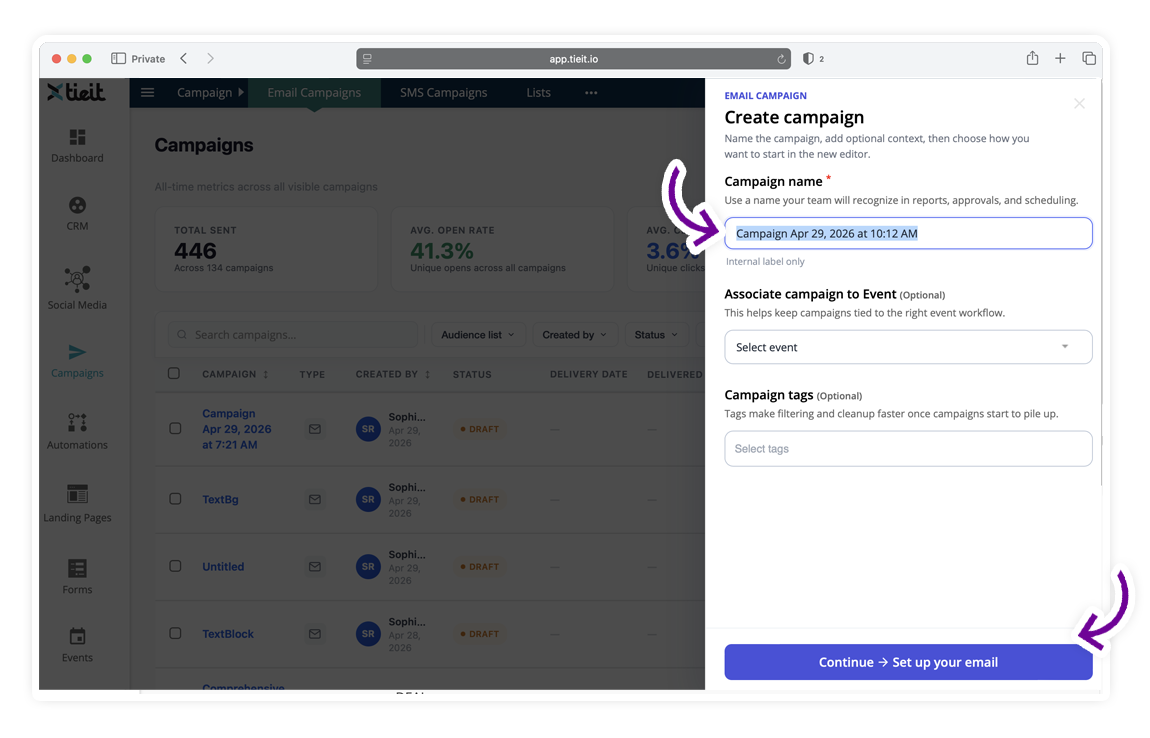
Step 1 — Create Campaign
- Go to Campaign → Email Campaigns.
- Click Create Campaign.
A panel opens on the right.
Fill in:
- Campaign name (internal name for reports and tracking)
- Associate campaign to Event (optional)
- Campaign tags (optional, useful for filtering later)
- Click Continue.
Step 2 — Set Up Your Email (Setup)
This screen defines what recipients see in their inbox.
What recipients see
- Subject line (required)
- Preview text (appears next to subject in inbox)
You’ll see a live Inbox Preview as you type.
Sender Identity
- From name
- From email
- Reply-to email

Click Next: Build.
If you need to standardize how your emails look and who they appear to be sent from, this is controlled from your workspace settings. You can define default branding (logo, colors, footer, social links) and create multiple sender identities for different teams or departments.
Campaign Settings & Sender Identities
This helps ensure every campaign follows your organization’s brand and sender rules without having to configure it manually each time.
Step 3 — Build Your Email (Visual Builder)
The email editor is built around flexible content blocks and layout controls. Understanding how sections, blocks, spacing, and structure work will help you design emails faster and with more consistency.
Before you start designing, we recommend reviewing this guide:
Understanding Email Content Blocks and Layout Options
This explains how to properly use text blocks, layout rows, and spacing inside the builder.
You are now inside the email editor.
You can design the email using:
- Visual Builder (drag-and-drop blocks)
- Compose (a simple composer)
Most users will use Visual Builder.
Add content blocks
- Click inside the email canvas.
- Add a Text area or any block from the left panel.
- Click the block to edit content.
- Use the controls to:
- Edit
- Duplicate
- Move
- Delete
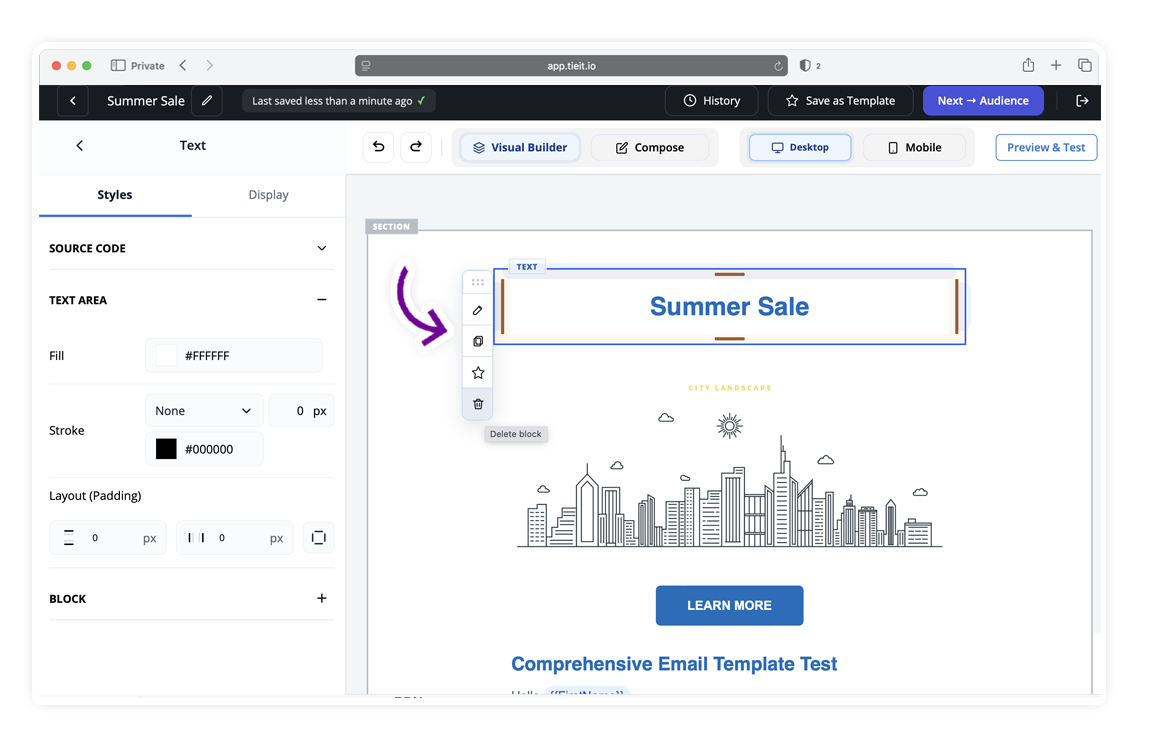
Styling options
From the left panel you can control:
- Styles
- Display settings
- Source code (if needed)
- Mobile width behavior
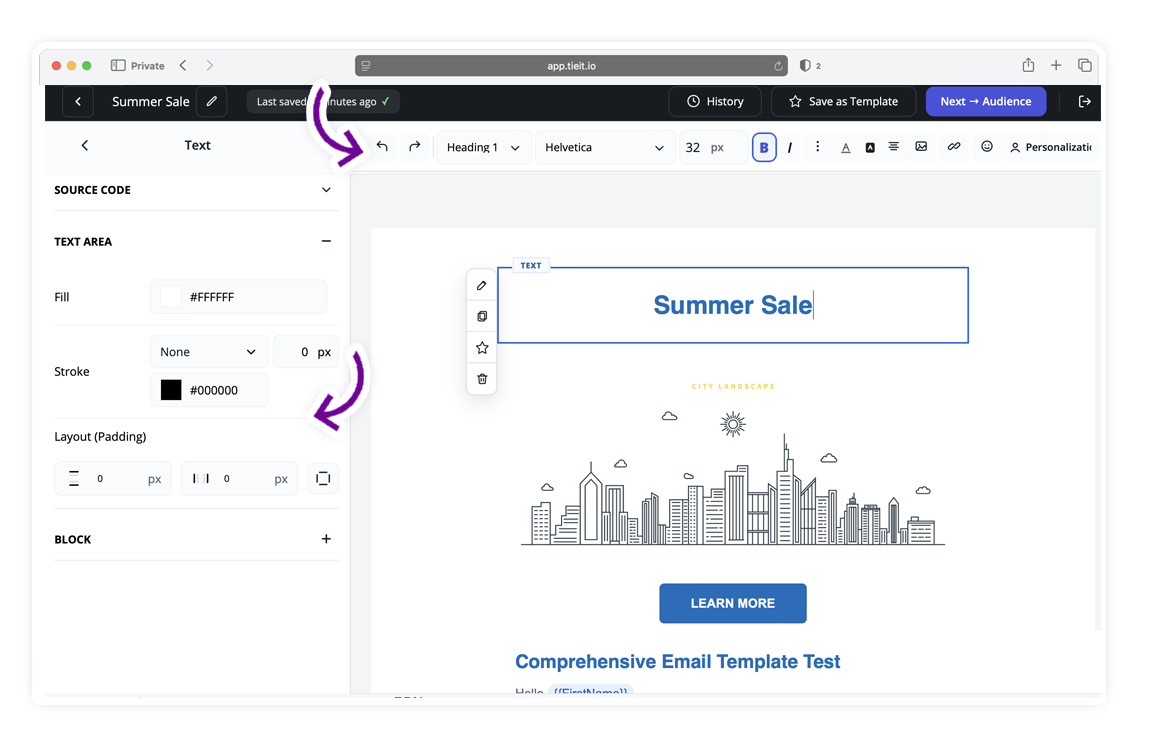
Preview your design
Use:
- Desktop / Mobile toggle
- Preview & Test to send a test email
You can also Save as Template for reuse.
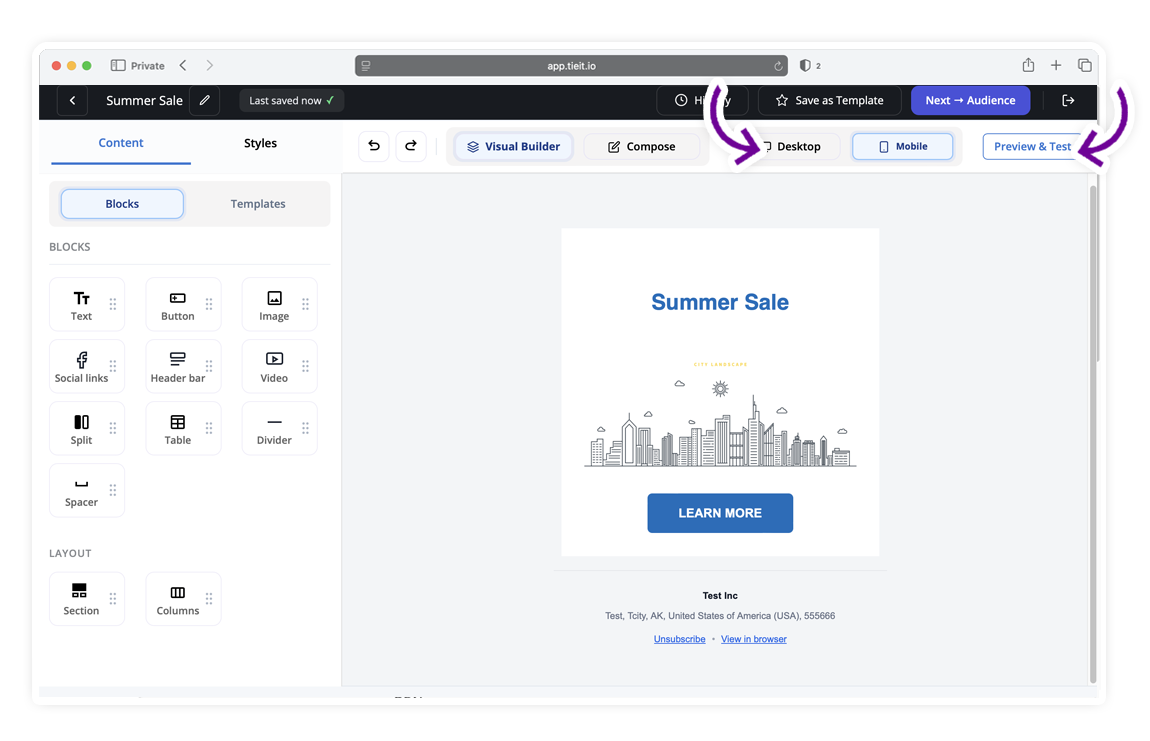
When done, click Next → Audience.
Step 4 — Choose Audience
Choose one or more groups of recipients:
- Lists – Select from saved lists
- Segments – Apply filtered audience segments
You can search and filter audiences to make selection faster.
Once selected, the total recipient count updates automatically.
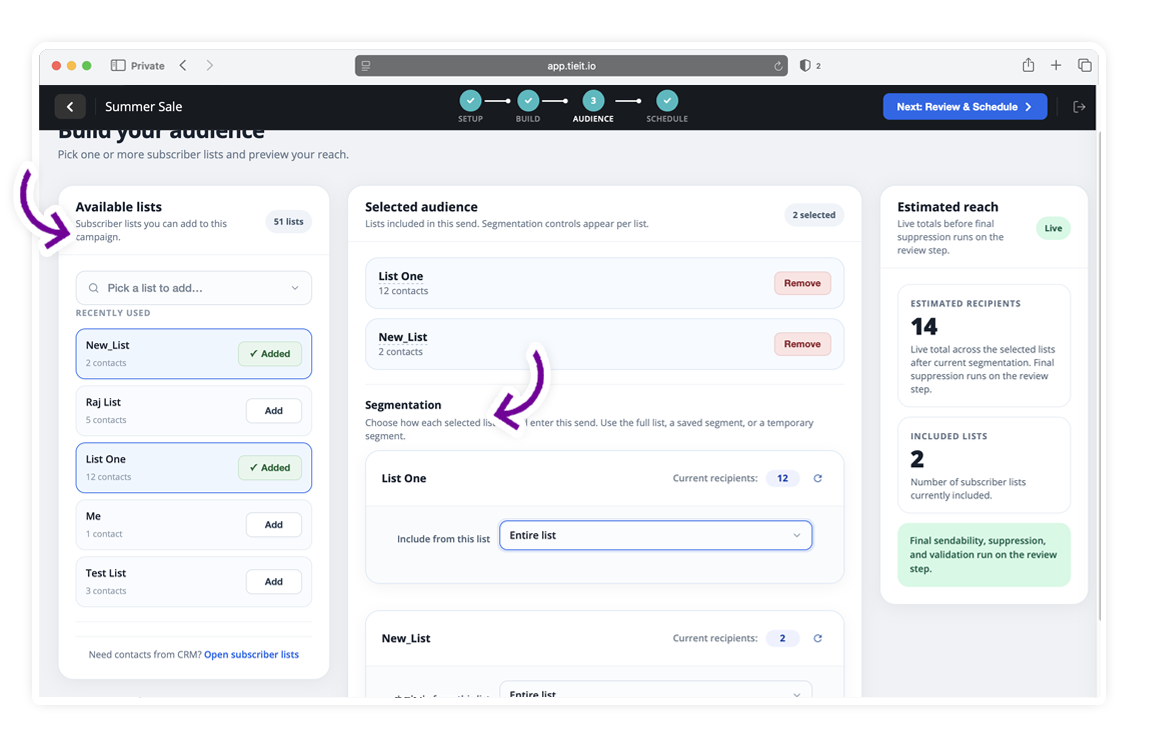
Click Next to proceed.
Step 5 — Review & Schedule
Review all key campaign settings in the final step:
- Audience size and details
- Email subject and sender information
- Content preview
Here you can choose to:
- Send now – Deliver immediately
- Schedule send – Pick a future date and time

Once ready, click Send Campaign or Schedule.
Tips for a smooth send & Best Practices
- Always send yourself a test email
- Check both Desktop and Mobile preview
- Keep subject line under 60 characters
- Use preview text intentionally — don’t leave it blank
- Verify the correct audience before scheduling
- Use clear subject lines to improve open rates
- Segment audiences for better targeting
- Test your email before sending
- Monitor open and click rates to refine future campaigns
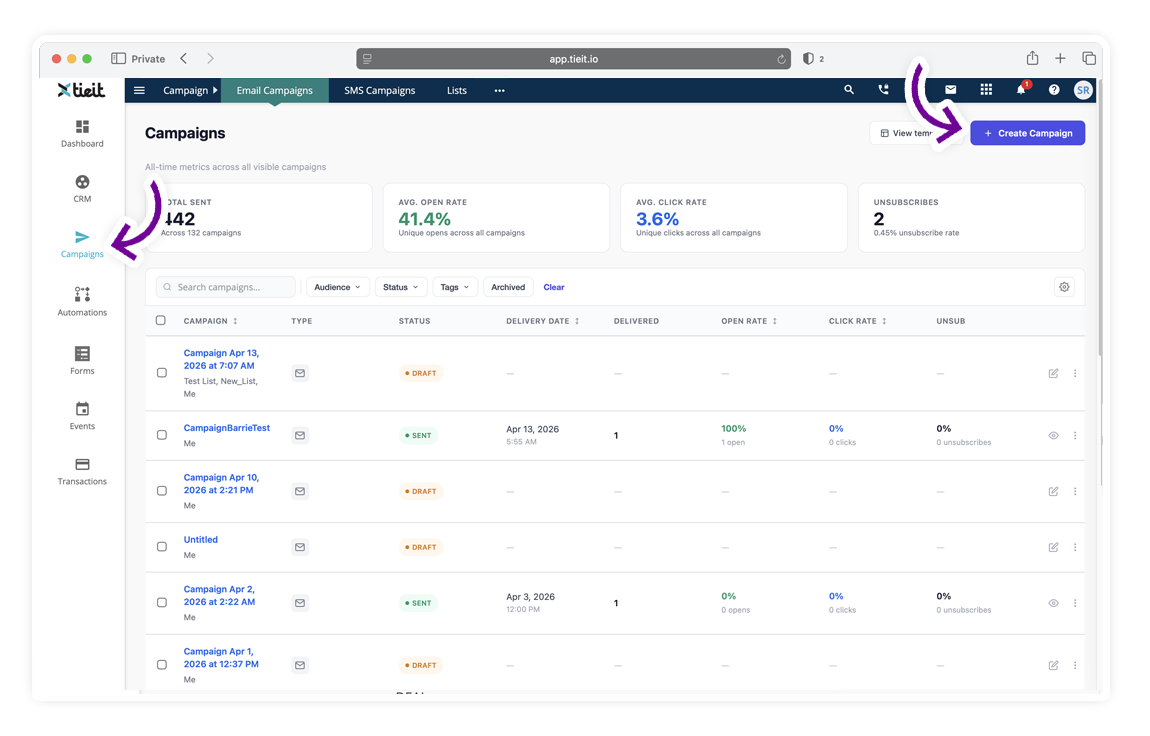
Manage Existing Campaigns
From the Campaigns listing page, you can:
- Search for campaigns
- Filter by status, audience, or tags
- Edit draft campaigns
- View sent campaign performance
- Archive old campaigns
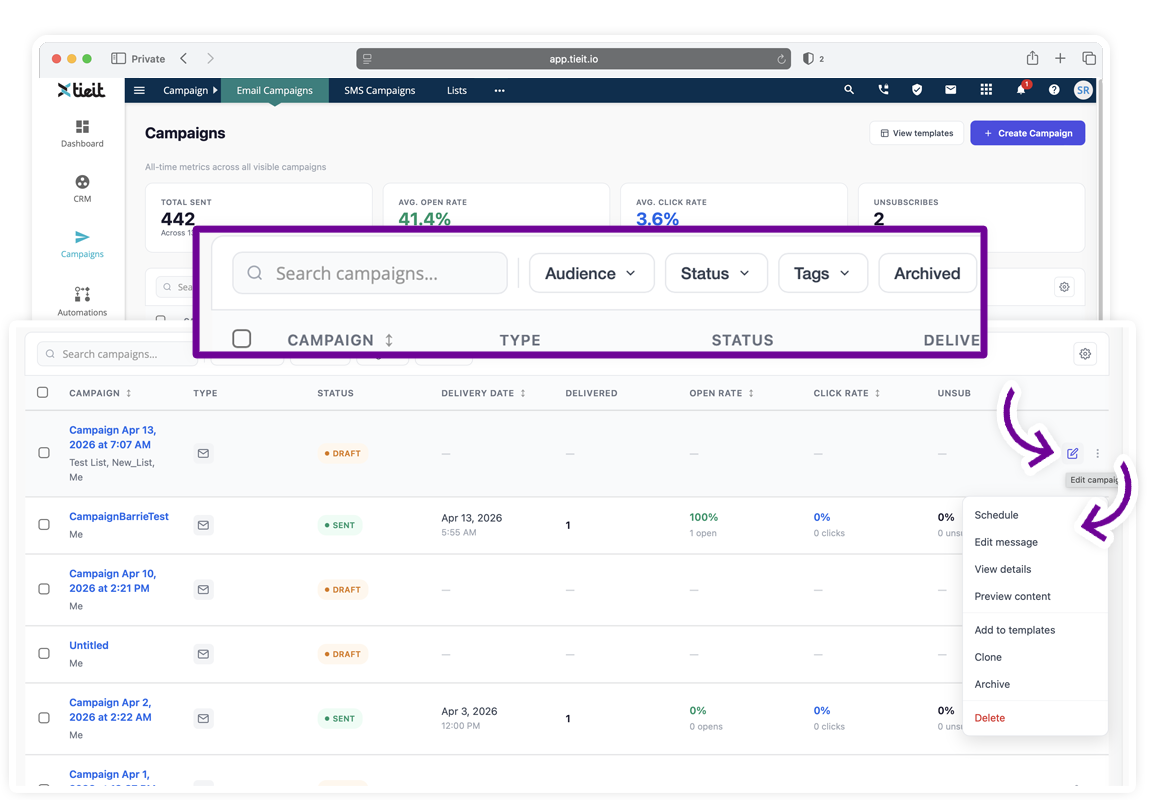
Use the action icons on each row to quickly access campaign options.
Campaign Statuses
Each campaign will show a status in the listing page:
- Draft – Not yet sent
- Sent – Delivered to recipients
Draft campaigns can be edited anytime before sending.
Track Campaign Performance
Once a campaign is sent, the listing page shows performance data:
- Delivered – Number of emails delivered
- Open rate – Percentage of recipients who opened the email
- Click rate – Percentage who clicked a link
- Unsubscribes – Number of recipients who unsubscribed
Click on a campaign to see more detailed engagement metrics.